Wednesday, June 5, 2013

My First Digispark Core Project - Blinking LED

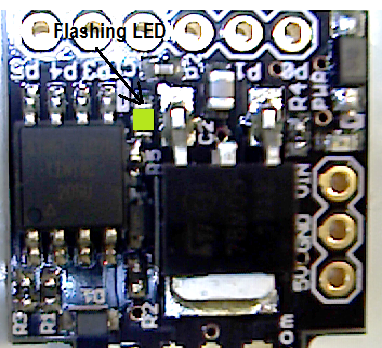
Digispark Flashing LED Shown In Green
     A previous blog entry detailed the contents of a new Arduino compatible microprocessor core with USB capability called Digispark.  The relatively small size of this platform along with capability for rudimentary USB connectivity without the need of any external components or boards makes this an attractive platform for PC interface projects.   This article will dive into a first implementation using the Digispark Core.

    In the world of software, a program that outputs "Hello World" is the usual first step to learning programming a new platform.  The "Hello World" in hardware development is often times to create a device that blinks an LED.  The Digispark Core has a single LED that can be controlled by an I/O pin.  Therefore, the goal is to setup the proper programming environment, compile the proper code, and transfer the blink firmware to the ATtiny85.

    First, the proper programming enviromnent should be installed on your platform.  The enviroment chosen was Windows, but Mac OSX and Linux are also supported.  Instructions were followed on the WIKI at: Digispark Software Installation.  A summary of steps for Windows is:

  1. Download latest Digispark customized Arduino environment.  Currently the latest shown on the WIKI is: Digispark Arduino Windows 32 Environment
  2. Unzip all contents to a target folder.  Be sure to leave the Digispark core unplugged from USB.
  3. From the target folder, locate the "...\DigisparkArduino-Win32\DigisparkWindowsDriver" and execute the "InstallDriver.exe" program.
  4. Start the Arduino programming environment located in the "...\DigisparkArduino-Win32\Digispark-Arduino-1.0.4" directory and run "Arduino.exe"
  5. Configure the Arduino environment for use with Digispark:
           a) Click on "Tools -> Board" and select "Digispark (Tiny Core)"
           b) Click on "Tools -> Programmer" and select "Digispark"
     Once these steps are followed, the proper environment will be installed and configured.  When running Arduino.exe, although a prompt to update the version was shown - we elected to ignore the update.

      Secondly, it was time to compile the first live program on the Digispark.  For this, under the "Arduino.exe" environment, click on "File -> Examples -> Digispark Examples -> Start".   This should load the LED blink code into the editor.

// the setup routine runs once when you press reset:
void setup() {               
  // initialize the digital pin as an output.
  pinMode(0, OUTPUT); //LED on Model B
  pinMode(1, OUTPUT); //LED on Model A  
}

// the loop routine runs over and over again forever:
void loop() {
  digitalWrite(0, HIGH);   // turn the LED on (HIGH is the voltage level)
  digitalWrite(1, HIGH);
  delay(1000);               // wait for a second
  digitalWrite(0, LOW);    // turn the LED off by making the voltage LOW
  digitalWrite(1, LOW);
  delay(1000);               // wait for a second
}


    In order to compile the code and transfer it to your Digispark, follow these steps:

  1. Make sure the Digispark core is not plugged into the USB port
  2. Under Arduino.exe, click on "File -> Upload".  Do not click on upload using programmer.  This will automatically compile the code.
  3. Notice the bottom of the Arduino window will show "Plug in device now... (will timeout in 60 seconds)".   It is important to quickly plug the Digispark core into the USB port quickly to avoid a timeout.
  4. When done correctly, your new code will be loaded and start running on the Digispark.
    Since the first programming was not clear if the original Digispark core from the factory was pre-loaded with the "Start" (blink) code, we decided to alter the firmware to present a faster frequency.  Changes to the original source are shown hilighted.

// the setup routine runs once when you press reset:
void setup() {               
  // initialize the digital pin as an output.
  pinMode(0, OUTPUT); //LED on Model B
  pinMode(1, OUTPUT); //LED on Model A  
}

// the loop routine runs over and over again forever:
void loop() {
  digitalWrite(0, HIGH);   // turn the LED on (HIGH is the voltage level)
  digitalWrite(1, HIGH);
  delay(250);              // Modification: wait 1/4 sec
  // delay(1000);             // wait for a second
  digitalWrite(0, LOW);    // turn the LED off by making the voltage LOW
  digitalWrite(1, LOW);
  delay(400);               // wait for nearly 1/2 sec  // delay(1000);              // wait for a second
}


     The result was a faster blink which proved programming over USB was working fine.  Now that the environment and process is complete, later projects can move on to more complex hardware and software implementations.  The next article will document use of the RGB shield.
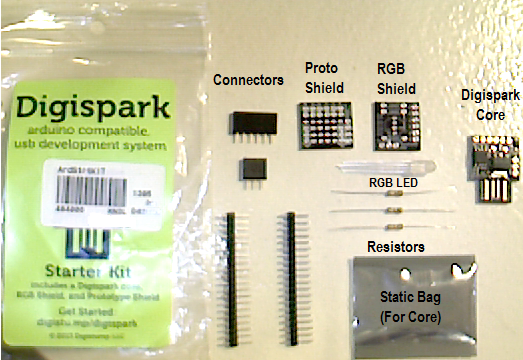
Digispark Starter Kit Added to Jason Whiteman's Hardware Lab

Digispark Starter Kit from Jason Whiteman's lab in Houston, Texas
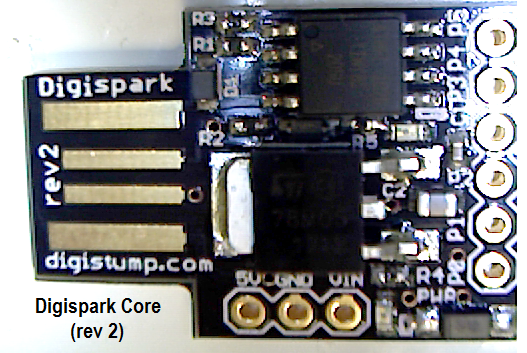
      June 4th, 2013 Jason Whiteman picked up a Digispark "Starter Kit" during his (nearly) weekly trip to MicroCenter in Houston, Texas.  The Digispark product is a smaller and less powerful Arduino-like open hardware platform in the form factor of a USB thumb drive without an outer case.  The Digispark core is comprised of USB gold-fingers for direct connection to a standard USB port, a voltage regulator (MC78M05 D-PAK), and the Atmel Tiny85 Microprocessor.


Digispark Core (2nd Revision) included in Starter Kit
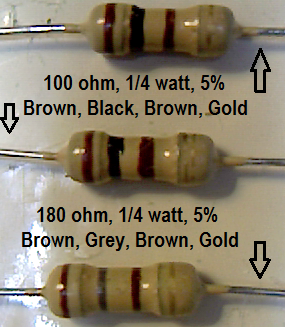
Digispark RGB Shield resistors
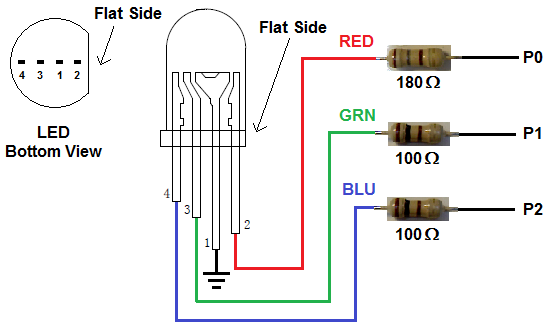
      The Starter Kit also includes the an RGB Shield.  The RGB Shield includes an RGB LED (4 pin: GND, red +, green +, blue +), necessary current limiting resistors, a PCB for soldering the components, and necessary jumpers for interfacing the RGB shield to the Digispark core.

      The red LED is using the 180 ohm resistor in order to decrease the current through the red LED.  Both the green and blue LEDs have 100 ohm series resistors.  Assuming 5V I/O voltage, the red LED sees 23mA (milliamps) and both the green and blue LEDs see 43mA.   According to Ohm's law (V=IR), the smaller the resistor the larger the current.  Larger currents result in greater intensity (brightness) within the maximum current limits of the part.  According to the datasheet, the maximum allowed current is 100mA.

Digispark RGB Shield schematic and pin 1 identification of LED

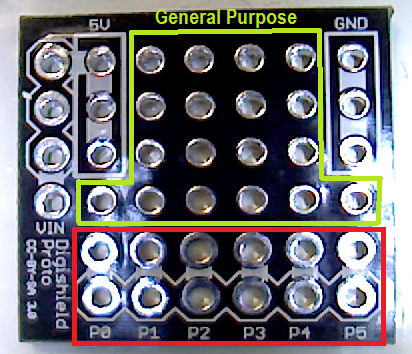
      The final component is a Prototype Shield which is simply a small board with 40 through-hole connections (pads).  Of these 40 pads, 12 are dedicated to the bus between the core and the shield (6 pads are for jumper connector, and 6 pads paired with these 6 jumpers and left open for user connections), 2 pads are dedicated to VIN, 4 pads are dedicated to GND, and 4 pads are dedicated to 5V.  This leaves 18 pins for general use.

Digispark Prototype Shield showing pad assignments

      At MicroCenter, it is possible to save a dollar by purchasing the RGB shield and Digispark core separately.  However, I elected to purchase the Starter Kit in order to get the Prototype Shield.  Although it is unlikely I will actually use the prototype shield, the extra "tax" for including it was worth the charge.

      For more information, reference relevant datasheets.


Atmel Tiny85 (ATtiny85)

1. Atmel ATtiny85 Datasheet

2. ATtiny85 does not natively support USB.  Find out more about the USB implementation through software/firmware:
USB Implementation (Software)

Note: USB speed is low-speed mode (1.5 Mbit/s) of USB2.0

3. Complete list of documents for ATtiny85


4. The following datasheet, although perhaps not the exact manufacturer, matches the RGB LED used in the Digispark kit.  RGB LED Datasheet 

5. Although this blog has a hardware focus, in order to get started using the Digispark core, you will have to familiarize yourself with the software and PC interface.  All of this information can be found on the WIKI site: Digispark WIKI

      Good luck developing your own Digispark solutions.  Perhaps in the future, this blog will be updated with specific applications of the Digispark starter kit.


Thursday, October 11, 2012

Jason Whiteman Adding More Capabilities To Lab in Houston, TX

Thursday October 11, 2012 - Jason Whiteman has been steadily investing into equipment and supplies for the electrical PCB debug and rework lab in Houston, TX.  A number of suppliers have been utilized including local stores such as Fry's Electronics and MicroCenter as well as online suppliers.

Items Recently Purchased:

     Kapton tape as a high-temperature insulator and general adhesive.  "Blue wires" can be secured with the tape.  Also, strategically placed tape can prevent shorts in cases where rework is done in dense areas.
Kapton Tape
Jason-Whiteman-Houston-Texas-TX-Lab-Equipment-Kapton-Tape
Jason Whiteman Houston TX Texas Lab Equipment Kapton Tape

      Jason Whiteman uses the Hakkon 808 desoldering gun to remove parts from PCBs or to rework boards that have an issue due to contamination.  The through-hole part with associated contamination can be removed without applying a large amount of heat or otherwise damaging the parts and PCB.


Jason-Whiteman-Houston-Texas-TX-Lab-Equipment-Hakko-808-Desoldering-Iron
Jason Whiteman Houston TX Texas Lab Equipment Hakko 808 Desoldering Iron


      Jason Whiteman uses Chemtronic's Flux-Off (No Clean Plus) in order to ensure reworked board is free of flux residue.  The flux is corrosive and conductive.  Therefore, the flux can affect circuit behavior unless it is cleaned from the board.


Jason-Whiteman-Houston-Texas-TX-Lab-Equipment-Chemtronics-Flux-Off-No-Clean-Plus

Jason Whiteman Houston TX Texas Lab Equipment Flux Off

Wednesday, October 10, 2012

It's Time To Break The Underscore Habit

   Previously, Jason Whiteman would name all of my files with underscores as spaces.  This is a carry_over [sic] from the DOS days where underscore ("_") was the only valid character to serve as a space.  However, due to SEO (search engine optimization), Jason is now learning to break that habit and name files with dashes ("-") as spaces instead.  Sure there are a ton of other techniques to SEO.  However, the "_" to "-" seems most fitting of a highlight from a design engineer.

   To find a large volume of SEO tips, there are plenty of other resources out there.  This blog is no place for a comprehensive guide.

Google Apps/Sites DNS Errors Resolved

    Jason Whiteman's webpage error 404 issues have not been resolved yet.  However, a problem with Google apps/sites whereby the fetcher ("fetch as Google") shows a "DNS error" issue has been resolved.  To fix the Google sites DNS error, email your DNS provider and ask them to fix the domain for use with Google.  Jason Whiteman's DNS provider knew what this meant and the issue was resolved within 24 hours of notifying the provider.

    Hopefully this will help others resolve their issue with Google's fetcher.

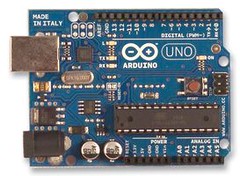
Jason Whiteman purchases Arduino UNO from MicroCenter

Tuesday, October 9 2012 - Jason Whiteman purchased an Arduino UNO board from MicroCenter in Houston, Texas near the Galleria. 

Jason-Whiteman-Houston-TX-Arduino-UNO
Arduino UNO Board Jason Whiteman purchased at MicroCenter in Houston, TX
The board will be used to prototype simple designs, to contribute to the open source hardware community, and to test other connected hardware.

Monday, September 24, 2012

Announcement - Jason Whiteman Houston, Texas Professional Musician Website

On September 14th, 2012 a new official website for professional musician Jason Whiteman was created.  The website augments a previous site last updated in 2007 (http://soultrane.freeunixhost.com). 

The new professional website for Houston, Texas based musician Jason Whiteman features a summary page (http://sites.google.com/site/jasonwhitemanhoustonmusician/jason-whiteman-houston-home) as well as more detailed information about Jason.

Along with a summary of Houston based saxophonist, keyboardist, bassist, and guitarist Jason Whiteman's equipment used, the webpage also features announcements and Jason Whiteman's upcoming performances in Houston, TX.

Jason Whiteman enjoys performing and arranging for small groups.

Finally, like many users of google sites, the official website for Houston, Texas based musician Jason Whiteman suffers from an error 404 when using a CNAME association.  A future blog will hopefully summarize the resolution to this issue.