 |
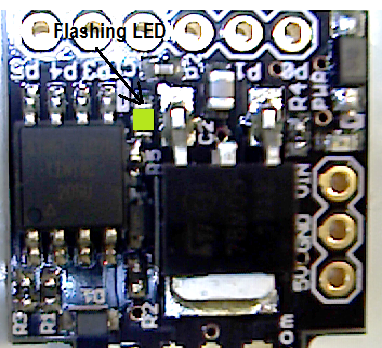
| Digispark Flashing LED Shown In Green |
In the world of software, a program that outputs "Hello World" is the usual first step to learning programming a new platform. The "Hello World" in hardware development is often times to create a device that blinks an LED. The Digispark Core has a single LED that can be controlled by an I/O pin. Therefore, the goal is to setup the proper programming environment, compile the proper code, and transfer the blink firmware to the ATtiny85.
First, the proper programming enviromnent should be installed on your platform. The enviroment chosen was Windows, but Mac OSX and Linux are also supported. Instructions were followed on the WIKI at: Digispark Software Installation. A summary of steps for Windows is:
- Download latest Digispark customized Arduino environment. Currently the latest shown on the WIKI is: Digispark Arduino Windows 32 Environment
- Unzip all contents to a target folder. Be sure to leave the Digispark core unplugged from USB.
- From the target folder, locate the "...\DigisparkArduino-Win32\DigisparkWindowsDriver" and execute the "InstallDriver.exe" program.
- Start the Arduino programming environment located in the "...\DigisparkArduino-Win32\Digispark-Arduino-1.0.4" directory and run "Arduino.exe"
- Configure the Arduino environment for use with Digispark:
b) Click on "Tools -> Programmer" and select "Digispark"
Secondly, it was time to compile the first live program on the Digispark. For this, under the "Arduino.exe" environment, click on "File -> Examples -> Digispark Examples -> Start". This should load the LED blink code into the editor.
// the setup routine runs once when you press reset:
void setup() {
// initialize the digital pin as an output.
pinMode(0, OUTPUT); //LED on Model B
pinMode(1, OUTPUT); //LED on Model A
}
// the loop routine runs over and over again forever:
void loop() {
digitalWrite(0, HIGH); // turn the LED on (HIGH is the voltage level)
digitalWrite(1, HIGH);
delay(1000); // wait for a second
digitalWrite(0, LOW); // turn the LED off by making the voltage LOW
digitalWrite(1, LOW);
delay(1000); // wait for a second
}
In order to compile the code and transfer it to your Digispark, follow these steps:
- Make sure the Digispark core is not plugged into the USB port
- Under Arduino.exe, click on "File -> Upload". Do not click on upload using programmer. This will automatically compile the code.
- Notice the bottom of the Arduino window will show "Plug in device now... (will timeout in 60 seconds)". It is important to quickly plug the Digispark core into the USB port quickly to avoid a timeout.
- When done correctly, your new code will be loaded and start running on the Digispark.
// the setup routine runs once when you press reset:
void setup() {
// initialize the digital pin as an output.
pinMode(0, OUTPUT); //LED on Model B
pinMode(1, OUTPUT); //LED on Model A
}
// the loop routine runs over and over again forever:
void loop() {
digitalWrite(0, HIGH); // turn the LED on (HIGH is the voltage level)
digitalWrite(1, HIGH);
delay(250); // Modification: wait 1/4 sec
// delay(1000); // wait for a second
digitalWrite(0, LOW); // turn the LED off by making the voltage LOW
digitalWrite(1, LOW);
delay(400); // wait for nearly 1/2 sec // delay(1000); // wait for a second
}
The result was a faster blink which proved programming over USB was working fine. Now that the environment and process is complete, later projects can move on to more complex hardware and software implementations. The next article will document use of the RGB shield.
Hi. A question; just ordered the digispark on eBay. Need it to activate the "pit speed limiter" leds (4/5 flashing leds). Im activating the pit speed limiter in the game (gtr2) by a momentary button soldered to an old joystick button. I need the LEDs to flash fast when activating speed limiter and to stop when deactivating speed limiter by the same button. Can I do that
ReplyDelete